Contact MeUse the contact form at the bottom on almost all the pages on this site or let's have a Other ways to Support My WorkSubscribe to Insight-Live.com. It is about doing testing and development, not letting information slip away. Help Me on Social
Login to your online account Chemistry plus physics. Maintain your recipes, test results, firing schedules, pictures, materials, projects, etc. Access your data from any connected device. Import desktop Insight data (and of other products). Group accounts for industry and education. Private accounts for potters. Get started. Download for Mac, PC, Linux Interactive glaze chemistry for the desktop. Free (no longer in development but still maintained, M1 Mac version now available). Download here or in the Files panel within your Insight-live.com account. What people have said about Digitalfire
What people have said about Insight-Live
| Monthly Tech-Tip from Tony HansenI will send practical posts like these (from thousands I maintain). No ads or tracking. We are troubleshooting the confirm email, for now you will be subscribed immediately (the first monthly email will provide one-click unsubscribe). BlogConverting a glossy transparent glaze to a calcium matteA ten-minute video to give glaze nerds goose bumps!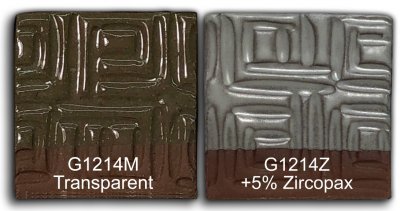
Watch the G1214Z video to see me convert the G1214M cone 6 clear base into G1214Z cone 6 calcium matte using simple glaze chemistry and recipe logic. This first appeared in the Digitalfire desktop Insight instruction manual 30 years ago. It is an understatement to say that this process is interesting if you want to know more about glazes, their chemistry and recipe logic. Watch this video and see me adjust the recipe of my high-calcium transparent cone 6 glaze to convert it into a calcium matte. In an Insight-live.com account, the process is easy enough for anyone. We'll cut the Si:Al ratio, increase the CaO, maintain the thermal expansion for glaze fit and make the recipe shrinkage-adjustable using a mix of calcined kaolin and raw kaolin. We will even compare it with the High Calcium Semimatte from Mastering Glazes. Context: Two cone 6 matte.., Partially and fully opacified.., A hazard of using.., Converting G1214M Cone 6.. Wednesday 7th January 2026 This GA6-B glaze is better than beer bottle glass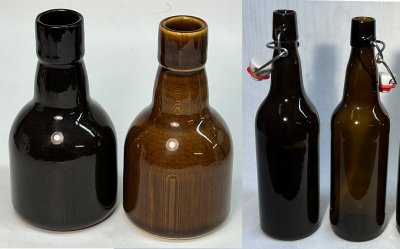
Ceramic glazes, like this GA6-B, are actually just glass. But they are not like bottle glass. The latter is formulated to work well in forming machines (harden quickly), melt and stiffen quickly, have low melt viscosity and resist milkiness and crystallization on solidification. The chemistries to accomplish this have adequate resistance to leaching and adequate durability for a few uses. A stoneware glaze melt needs to be much more viscous (to stay put on vertical surfaces). And, it must have a lower thermal expansion (to match common clay bodies). And, it must resist crystallization much more (since it cools slowly). Fortunately, meeting these needs brings along big benefits: Greater durability, hardness and resistance to leaching. Stoneware glazes and bottle glass share a common trait: They have about the same amount of SiO2. But the similarity ends there, stoneware glazes have: Context: 3D-printing artifacts on a.., Meet two glazes at.., Regular bottles of beer.., v7 Classic beer bottle.., Food Safe, Beer Bottle Master Mold.. Wednesday 7th January 2026 Insight-live reference recipes - Many more and much better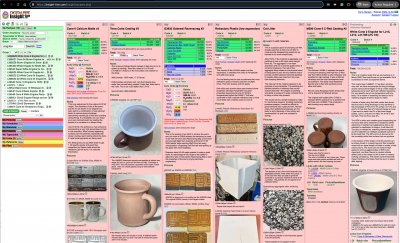
I have seven open side-by-side. There are hundreds of them, and all are well-documented with test results and photos. There are glazes, engobes, bodies, materials and special-purpose recipes. All of them are ones that have been shared over the past decade from our Insight-live.com account. These are great to open beside recipes you are evaluating or testing, it can be a real eye opener to see the chemistries and recipes compared. Monday 29th December 2025 Glaze dunking videos reveal the value of thixotropy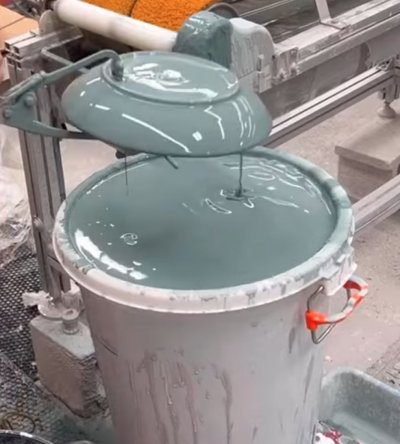
These videos from Eastfork Pottery demonstrate their use of thixotropic glaze slurries. Watch them to see how effective a highly gelled glaze is. It enables a quick dip, stays fluid while draining, gives even coverage and dries in seconds. These don't hard-pan or settle out in the bucket either. They work on porous or dense bisque. Almost any glaze can be thixotropic if you take the time to learn how to do it. The fast drying enables the use of twin running (or twin belt) foot wiper machines (best shown on these Instagram and Facebook videos). Context: Instagram Eastfork Pottery thixotropic.., Tiktok Eastfork Pottery thixotropic.., Facebook Eastfork Pottery thixotropic.., Eastfork Pottery, Thixotropy Thursday 11th December 2025 Glaze cracking during drying? Wash it off and then do this.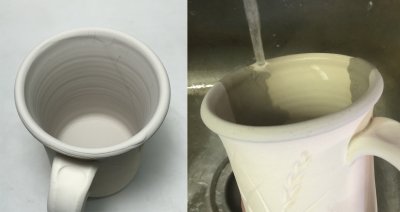
If your pottery glaze is doing on drying then it will crawl during firing. Wash it off, dry the ware. Then check the water content. If the glaze has worked fine in the past then it is likely going on too thick because the specific gravity is too high - just repeat cycles of adding a little water and dip testing (make it thixotropic if needed). But that was not the issue here. Glazes need clay to suspend and harden them, but too much clay means trouble. This was Ravenscrag Slip, a clay, being used pure as a cone 10R glaze. The glaze appeared to go in perfectly and it dried to the touch in ~20 seconds. But shrinkage continues after that, revealing after a couple of minutes. Fixing the issue was a matter of adding some roasted Ravencrag Slip to the bucket. That reduced the shrinkage and therefore the cracking. Any glaze containing excessive kaolin can be fixed the same way (trade some of the raw kaolin for calcined kaolin). Some glazes that contain plenty of clay also have bentonite - a simple fix for these is to simply remove the bentonite. Context: Calcined Kaolin, Calcination, Crawling Friday 5th December 2025 Custer Feldspar vs Nepheline Syenite at cone 8 oxidation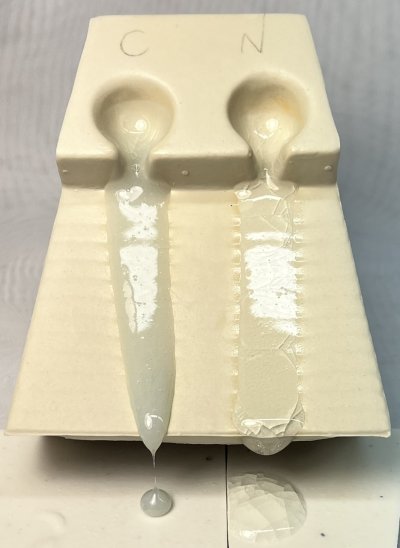
Although Nepheline Syenite and Custer Feldspar are used as effective body maturing agents and fluxes in glazes past cone 6, curiously, neither of them melt well by themselves. Thus, both of these come 6 melt fluidity tests add 20% Ferro Frit 3134 to get them flowing. This is a 2021 shipment of the feldspar and a 2022 shipment of the nepheline. Context: Custer Feldspar, Nepheline Syenite, Casting pure nepheline syenite.., Pure nepheline syenite mug.. Thursday 27th November 2025 Low fire ware cracking during firing. Why?
Most low-fire bodies contain talc. It is added for the express purpose of increasing thermal expansion. The natural quartz particles present do the same. These are good for glaze fit but bad for ware like this. There are also sudden volume changes associated with cristobalite, but it forms (from quartz) at stoneware temperatures so should not be a concern in terra cotta or a white low fire body. You could fiddle with the clay recipe or change bodies, but better to change the firing schedule. The quartz in stonewares goes through a sudden volume change between 950-1150F on the way down. Quartz particles in low fire bodies will do the same. A simple fix is to slow down the entire cooling cycle like this potter did. Or, learn to program your kiln to approach this range more slowly, then ease down through it. No electronic controller? Learn a switch-setting-schedule to approximate this down-ramp (buy a pyrometer if needed). Context: Manually programming a Bartlett.., Dunting, Quartz Inversion, Cristobalite Inversion, Cristobalite Sunday 23rd November 2025 Non-plastic, very stiff clay is required hereNo potter could use it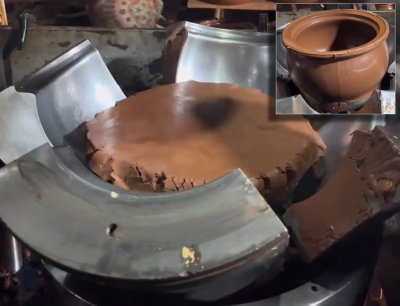
Potters love plastic clay. On the wheel it enables pulling larger, more overhang, thinner walled pieces. For beginners it can make the difference between success or a collapsed lump of mud. The downside is high drying shrinkage and danger of cracking. But potters know how to exercise care in drying to get success anyway. Context: Video on Instragram shows.. Saturday 22nd November 2025 Thrown pieces made from pure Grolleg and EP kaolinsThis is how you compare plasticities
These have just been thrown on the wheel. I find it to be a foolproof method of comparing the plasticity of two clays. They were slurried up and dewatered to about the same moisture content and the same amount was thrown to compare the size achievable. While the Grolleg is stickier and dewaters a little slower, it is not nearly as plastic as EPK (which itself is not that plastic compared to others). Curiously, New Zealand kaolin (halloysite) is quite a bit less plastic than the Grolleg but it responds to plasticity augmentation (in porcelain recipes) just as well as Grolleg (similar amounts of bentonite producing similar plasticities). And, bodies containing EPK also need about the same amount of bentonite to produce plasticity suitable for throwing large forms. So, the plasticity that a kaolin appears to have by itself is not completely indicative of what it will contribute to a body (if augmented with bentonite). The EPK used here is the darker and more plastic of the two varieties Plainsman receives. Context: EP Kaolin, EPK fired bar top.. Wednesday 19th November 2025 The ultimate example of delayed crazing: 90 years!Glaze chemistry is the key to understanding it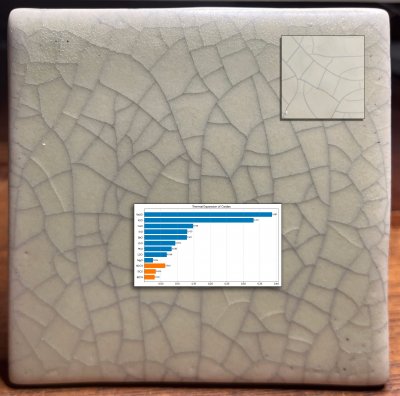
A restoration project faced a tile-matching challenge. At installation in a bathroom 90 years ago, the tiles were not crazed. But between then and now it happened (shown inset upper right). Now, a restoration specialist is tasked with duplicating the aged effect (one unsuccessful attempt is shown here). The shade, opacity, degree of matteness, bubble-free matrix and surface character of the original are all real challenges. Duplicating the crazing is even more difficult. Why? Matching "time-crazing" with a crackle glaze pattern will be temporary (it will craze much more after installation). Context: Turning delayed crazing into.., Glaze Crazing Monday 10th November 2025 |

https://digitalfire.com, All Rights Reserved
Privacy Policy


